Saturday, July 2, 2011

2011 Dye Exchange

I have been busy doing a lot of spinning and knitting the last few weeks. Remember the pile of fiber from my spinning guilds dye exchange? Well it is now all spun up and here are the pictures.
If you remember the color for this year was blue, my favorite color. In these pictures I have finished setting the twist, and I'm letting the yarn dry. When I spun the yarn, I mixed up all the different rovings, and randomly pulled out pieces to spin.
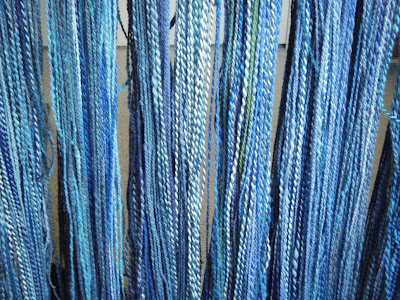
Here is a close up of the color changes as it was spun. The yarn is now put up and is ready to work with.
The pattern that I choose to use for this yarn is "The Raglan Sleeve Topper" Its a free pattern from Lion Brand yarns. Here is the back. I really enjoy watching the colors change as I work through the pattern.

I'll keep you updated on my progress.

Friday, July 1, 2011

Etsy Special


In honor of the "pioneer" spirit that is celebrated this month in Utah, I am having a free shipping special at my Etsy site. When you check out type in the coupon code "pioneer" to take advantage of the month long special.

Sunday, June 26, 2011

New Online Shop


Hey everyone, just wanted to send out a quick shout out about my new Etsy shop. If you want to see what I have just look to the right in the side bar and click on the pictures. That will take to my shop where I have many more items listed than I could show on this little side bar. Tell your friends as well. Oh and watch for the "Pioneer Special" coming up in July.

Sunday, April 17, 2011

Friend or Foe

This is my newest fiber tool. So far it doesn't look very threatening. This is a set of English combs, and they are used to comb wool into roving. In this picture they have a protective wood sleeve over the tines of the combs. The coverings are made of wood for a good reason . . . . This is what's under the covers. These metal tines are very sharp, and long. There are 4 rows of tines, and they range in length from 4 to 6 inches. These combs came with a mounting board, and you will see in a moment why it is needed.
After I remove the sleeve, and have the comb secure, I start loading the comb with fiber.
I then turn the comb on it's side, and secure it in this possition.
I remove the other comb from the holder, and begin combing in a downward motion, being careful to only comb the wool, and not catch the tines.
I comb the wool until most of the wool has come off the stationary comb, and then using the comb in my hand I comb it back onto the stationary comb. I continue this until all the tangles have been combed out.
This is a "diz". It's made out of mother of pearl. I really like the design, but aside from being pretty, it is also functional. If you look closely you will see that there are different size holes in the design. This is not a mistake.
If I want a fine roving or sliver, I choose a small hole. If I want a thicker roving I choose a larger hole. When the wool has been combed out, I place half of the combed wool on to the stationary comb, and pull it into a beard. I take a small amount and gently pull it through the diz.
Useing both hands in a leap frog motion, I gently pull about 2-3 inches of the fiber through the diz, and then slide the diz toward the combs.
When I have pulled all the long fibers through the diz all that's left in the combs is short nubby fiber. I then gently wind the roving around my hand to make a little nest, and throw what's left in the comb away. If I wanted to use the waste from the combs I could use it as a stuffing.
I am really pleased with how these combs prepare the wool for spinning. By having only the long fibers going in one direction like this, I can then spin this wool into a worsted yarn. What that means is that there are no air pockets in the yarn. This yarn when spun will be very smooth, so if I need a yarn that will show stitch definition this will be the type of yarn that I will use.

Saturday, April 16, 2011

Washing My Locks

I thought I would try doing something different today. I had heard, and seen some other fiber artist wash their wool "in the locks". What this means, is that the wool is washed in a specific order with the butt of the wool and the top of the wool all in the same direction. In order to do this I need to keep the locks of wool stable during the washing process. In this shot I have some tulle laid out on my counter. I then take some locks of wool, (by the way this is a grey fleece) and lay the locks out on the tulle side by side, with all the cut ends (or butt ends) pointing down, and the tops pointing up. I then fold the tulle over the locks sort of like a burrito and secure with safety pins.

I set up my wash water just like I would do for any fiber, using very hot water, and my favorite wool wash. I gentle lay the packets of fiber in the water and let them soak for about 20 minutes. After they have finished soaking, I carefully rinse the packets out. I then put them in my table spinner to spin out the excess water, and then lay the packets out flat to dry.
This what the locks look like after they have dried and I have removed the tulle.
These are now ready to use on my newest fiber tool that I recently bought. I'll show you what that is next time.

Wednesday, March 23, 2011

Trickin' Out My Ride

I can sure tell that winter has been around way to long, so to bring some light heartedness into my day I decided to make this. . . .


That's right, it's a spare tire cozy. My co-workers and husband think that I have to much free time on my hands, and I would have to say that they are right. The pattern is really a knitted doily, but when you use bulky yarn, and size 10 knitting needles you too can make a stunning, eye catching, tire cozy. Some of you might recognize this pattern from Jared Flood. It's the Hemlock Ring Doily Throw. I made it just as the pattern instructed, but then added loops around the outer edge and wove in 1/2 inch elastic.


Also, last Wednesday was the fiber exchange at my spinning guild meeting. This is the eye candy that I brought home. Everyone was really intrigued with my sheepdog fiber and many came back and traded more of their fiber for another ounce or two of it.


I just love the vibrant, blue, jewel tones of the these. I think I will be spinning it up very similar to what I did with last years exchange, but I do have a pattern in mind for this fiber. Hopefully with the full two pounds I will have enough to make it.


Tuesday, March 8, 2011

New Toys

Here are my two newest toys.

This first little beauty is a box tape loom. I purchased it new, but it was made to replicate ones that would have been made in the 1800's. These were common in households to make narrow bands of woven fiber. If you ever needed something to tie up a bag or use as a strap you would simply go over to the box loom and cut off what you needed.


The body of the box is made from green popular, with maple trim. And the reed, is made from canary wood.
It is a very simple loom to set up, and you can weave when you have time, and then either wind the finished tape on the dowel behind the reed, or let it gather in a basket on the floor. I think it is going to be a fun little loom to have up at work this summer. I think I might even let guests try it out.

The maker of this loom put these cute inlaid hearts into the loom as well. This heart lets me know that this is the back of the reed.

And since it's going with me to work I needed to make sure that it had my mark on it as well.

New toy number 2.
I thought having a small table loom that would be easy to carry around and do demonstrations on would be a good thing to have. So I went on Ebay and found this little beauty. This one is not a replica, but I'm not sure how old it is. When I did some research on similar looms I found that these were made as children's looms to learn how to weave. The size is 12" high, 15 1/2" wide, and 14 1/2" long.

The wood was very dirty and needed to be cleaned and oiled, so that was the first step in the restoration. The string heddles were also in very bad shape, so I threw those away and made new ones. In the above picture you can see that it is missing the dowel to tie your warp to. That also was an easy cheap fix. The reed however was in very good shape. No rust at all. Many of the other little loom like this one had very rusty reeds, and the wood on them looked like cheap balsa wood.

Here is my new loom all clean, oiled, with parts replaced, and all warped up.

I also did some light sanding with a fine sand paper and steel wool. The wood is now smooth so as not to snag the fibers, and it works as good as it looks.

I already have two demonstrations to do this week, so I'm happy that I bought these looms.